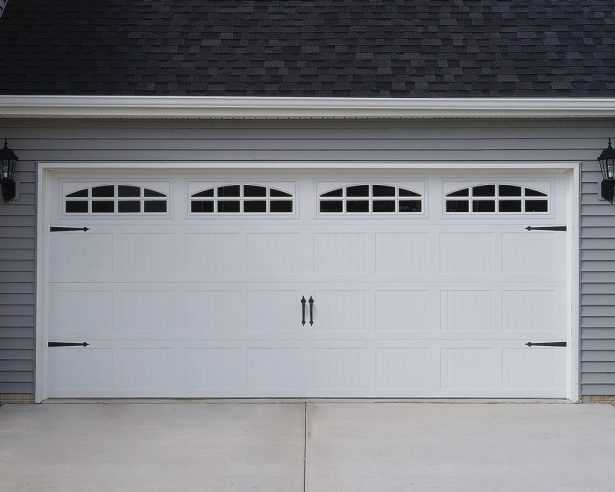
How To Add Windows To Existing Garage Door Panels
Adding windows to an existing garage door can transform a dark garage into a brighter, more useful space. Natural light makes a workshop, home gym or storage area feel less enclosed, while glazed panels can give the front of a house a more considered architectural appearance.
The work is possible on some sectional and tilt doors, but it is not suitable for every panel. Garage doors are balanced moving systems, and cutting into a panel can affect its strength, weight, insulation and weather resistance. The safest approach may be replacing one or more panels with factory-made window sections rather than modifying the originals.
Australian homes also need to account for intense sun, sudden storms and large temperature changes. A window arrangement that works well in a mild climate may create excessive heat in a west-facing garage in Perth or increase glare in a Brisbane carport.
Before ordering materials, identify the door manufacturer, panel profile, dimensions and opening mechanism. A qualified garage door technician can confirm whether the existing tracks, hinges, springs and opener are compatible with the proposed glazed section.
Why Add Glazing To A Garage Door
Windows can provide useful daylight without requiring a separate side window or major building work. Frosted, tinted or obscure glazing can admit light while reducing visibility into the garage, which is valuable when the door faces a footpath or busy street.
A row of windows near the top section is a common arrangement because it preserves privacy and leaves room for shelves, storage cabinets and vehicles. Vertical panes can suit contemporary homes, while smaller square inserts often work with traditional brick or weatherboard façades.
Replacing a solid top panel can also improve the appearance of an older door. However, windows add weight and may change the way the panels fold or travel through the tracks. The opener may need adjustment, and a door that was already difficult to lift should be serviced before any alteration.
Check The Existing Door Before Cutting
Start by finding the door’s make and model. In Australia, sectional doors from B&D, Gliderol, Steel-Line and other manufacturers may use different panel thicknesses, hinge positions and window-frame systems. Two doors with the same apparent width may still require different replacement components.
Measure the width and height of each panel, the overall door opening, the stile positions and the distance between hinges. Look for damage, corrosion, delamination, loose fasteners or sagging. If the panel is made from thin steel or has an internal foam core, cutting it can expose insulation and create a weak edge.
Roller doors require particular caution. Their curtain rolls into a coil above the opening, so adding conventional windows to individual slats is generally unsuitable. A sectional or tilt door is usually a better candidate, although a specialist should approve any modification to the curtain or lifting mechanism.
Choose The Right Window Style And Material
The most reliable option is a purpose-built replacement panel with glazing already installed. These panels are engineered to match the door’s profile and usually include reinforced window surrounds, seals and compatible hinge locations. They cost more than a DIY insert, but they reduce the risk of distortion and air leakage.
If the original panel can be modified, choose a window kit designed for garage doors rather than a household window. The frame must be light, secure and able to tolerate vibration. Acrylic or polycarbonate glazing is often lighter and more impact-resistant than ordinary glass, while laminated safety glass offers a more substantial finish.
Clear glass delivers the most daylight but provides a direct view into the garage. Obscure, frosted, tinted or translucent panels offer better privacy. In hot parts of Australia, such as Darwin, Townsville and much of Western Australia, solar-control glazing can reduce heat gain. A north- or west-facing garage may benefit from a low-glare finish.
| Option | Advantages | Limitations | Suitable use |
|---|---|---|---|
| Factory replacement panel | Strong fit, finished seals, minimal cutting | Higher purchase price | Most sectional doors |
| Garage-door window kit | Convenient and widely available | Requires accurate cutting and sealing | Sound compatible panels |
| Acrylic glazing | Light, impact-resistant, easy to handle | Can scratch or discolour over time | DIY-friendly installations |
| Polycarbonate glazing | Tough and relatively light | May cost more and show surface marks | Areas exposed to impact |
| Laminated safety glass | Premium appearance and good safety performance | Heavier, requiring careful balance checks | High-quality permanent upgrades |
| Frosted or tinted glazing | Better privacy and solar control | Less clear outward visibility | Street-facing garages |
Measure And Plan The Window Layout
Mark the proposed window positions from the centreline of the panel, not from a nearby hinge or edge that may be slightly out of square. Keep clear of hinges, reinforcing bars, handles, locks and the panel’s perimeter rails. A symmetrical layout usually looks more professional and keeps the load evenly distributed.
Use cardboard templates or painter’s tape to test the design from the driveway. Check how the windows align with brick courses, façade features and nearby doors. In Australian suburbs, where wide double garages are common, a long horizontal band of glazing can balance a broad frontage better than several randomly spaced inserts.
Allow space for the frame, fixing screws and weather seals. The rough opening must follow the kit manufacturer’s dimensions exactly; a few millimetres of excess clearance can lead to movement, rattling and water entry. Measure twice, then compare the measurements against the installation instructions before cutting.
Think about the door’s travel path as well. A window may appear clear when the door is closed but collide with a ceiling-mounted opener, storage rack or track obstruction as the panels move. Photographing the full opening and folded position can help a technician identify practical problems before work begins.
Install A Replacement Panel Or Window Insert
A factory-made glazed panel is normally installed by disconnecting the opener, securing the door and removing the existing panel from its hinges and tracks. Because the remaining sections can shift or fall, this is not a safe job to improvise with the door partly open. Trained installers use supports and follow the manufacturer’s removal sequence.
For an approved window insert, the panel is usually removed and placed flat on padded supports. The opening is marked with a template, then cut using the tool specified for the panel material. Edges must be finished and protected so that steel does not rust and foam cores do not absorb moisture.
The frame should sit square and seal evenly against the panel. Use compatible fasteners and sealants; household silicone alone is rarely an adequate structural fixing. Do not overtighten screws, as this can distort thin steel or crack plastic glazing. The finished insert should be firm, smooth and free from sharp edges.
After reassembly, inspect every hinge and roller. The door should move evenly by hand with the opener disconnected. If it binds, drops, rises by itself or feels substantially heavier, stop using it until the balance and spring system have been checked.
Manage Weather, Security And Local Conditions
Australian weather makes sealing particularly important. Driving rain around Melbourne or coastal New South Wales can find small gaps, while salt air near Adelaide beaches, the Gold Coast or Fremantle can accelerate corrosion on exposed metal. Use corrosion-resistant hardware and maintain the original drainage paths in the panel.
Windows can slightly reduce security by making it easier to see vehicles, tools or bicycles inside. Obscure glazing, internal blinds or a high window position can limit this exposure. Avoid placing valuable items directly behind clear panes, especially if the garage opens onto a laneway or front driveway.
Building and renovation requirements vary between councils and property types. A straightforward garage-door panel replacement may not need the same approval as altering a wall or creating a new opening, but strata properties, heritage homes and bushfire-prone areas can have additional rules. A local installer can identify relevant requirements before ordering.
The panel’s new weight must be checked against the opener. If the motor strains, reverses unexpectedly or stops short, do not simply increase the force setting. Incorrect force adjustment can create a safety hazard. If the opener needs resetting after the door work, use the manufacturer’s instructions or follow a reliable guide to change opener codes when access security also needs updating.
Test The Door And Maintain The Upgrade
Reconnect the opener only after the door has passed a manual movement test. Run several complete cycles while watching for panel flex, unusual noise, uneven gaps or hesitation at the bends in the tracks. Test the automatic reversal system with the manufacturer’s approved method and confirm that remote controls and wall switches still operate correctly.
Inspect the window seals after the first heavy rain. Look for moisture, condensation between glazing layers, draughts and movement around the frame. Small leaks are easier to correct early, before water reaches insulation, internal steel or stored belongings.
Clean glazing with mild soapy water and a soft cloth, especially when acrylic or polycarbonate is used. Avoid abrasive powders and harsh solvents that can haze or scratch plastic surfaces. Check screws, hinges and rollers during the regular garage-door service, and lubricate only the components recommended by the manufacturer.
If a panel cracks, becomes warped or begins rubbing against the adjacent section, stop operating the door. A damaged glazed panel can break under vibration, and a misaligned door can overload the springs or opener. Prompt attention is generally cheaper than repairing a damaged track or lifting system.
A well-planned window upgrade can add daylight, improve street appeal and make an Australian garage more practical throughout the year. Begin with the door’s construction and balance, select glazing suited to local heat and privacy needs, and favour a matched replacement panel whenever possible.
For a secure result, arrange an assessment with a qualified garage-door technician before cutting or ordering parts. Confirm the panel profile, window layout, spring balance and opener settings, then have the finished installation tested in both manual and automatic operation.